GTCS Game Engine:
Tutorial 2: Resources & User Input
Tutorial 1 <-- Tutorial 2 --> Tutorial 3
Tutorial Homepage
Introduction
In Tutorial 1, we looked at creating the basic structure for our game scene. We created a camera object and a game object with a simple renderable. In this tutorial, we will look at resource management, a more advanced renderable type and user input.
Covered Topics: Loading Resources • Keyboard input • Audio & Mouse • Text
Demonstrations: Drawing with a Texture • Keyboard • Audio & Mouse • Text Renderables
Complete source code for all tutorials can be downloaded from here.
Loading Resources
Images, audio, and other file types are the external resources that your game will use. We will add the load() function to the Scene subclass in order to make requests to the engine to load files in the by providing the file paths where the files can be located. The engine will asynchronously load the files into RAM and provide a means of accessing them so we can start using them. The load() function is always called prior to init() and you are guaranteed that the resources have fully loaded when init() is called. Once the resources are loaded, different classes of objects will retrieve resources as needed by providing the string path to the resource. These variables identify each unique resource.
As a matter of convention, the game engine has a folder in it's hierarchy called "assets". While you can technically use any folder to store resources (as long as the path is properly referenced in the loading and unloading), we will use this folder to store our resource files. This will keep things consistent and organized.
[Note: The assets folder is also used by the game engine for it's own assets such as default fonts. Do not delete, move or modify the existing files or hierarchy.]
Constructor
To facilitate the loading of resources, we create variables to identify the file paths for our resources and provide a consistent way for referencing the resource. By convention, we store resource files in the "assets" directory of our game engine file hierarchy. The game engine supports PNG image files, WAV audio files and text files. We are going to load a 64x64 pixel image to use as a texture for drawing our game element.
[Note: When creating resources for texture maps, the dimensions must be powers of 2. Examples of usable image sizes include 64x64, 512x2048 or 16x128.]
    constructor() {
        super();
        this.mCamera = null;
        this.mGameObj = null;
        this.mRenderableBox = null;
	this.kTexture = "assets/minion_portal.png";
    }
The code above declares three instance variables that will be used in our scene as well as a
string constant that identifies the path to an image resource file.
load() and unload()
The load() function will queue our texture for loading by using the engine.
texture.load() function. There is also engine.audio.load() function for loading audio files, engine.xml.load() function for loading xmls files, and a
engine.font.load() function for loading font files. The files we identify will load asynchronously, so we can not use a resource that is not loaded.
    load() {
	engine.textures.load(this.kTexture)
    }

    unload() {
	engine.textures.unload(this.kTexture);
    }
initialization()
The initialization() function is mostly the same as it was in the previous tutorial. Now we create a TextureRenderable instead. This new renderable has all of the same functionality as the Renderable but allows us to utilize a bitmap image instead of using a solid color.
   init() {
	this.mCamera = new engine.Camera(
		vec2.fromValues(50, 50), // position of the camera
		100,                        // width of camera
		[0, 0, 600, 600],         // viewport (orgX, orgY, width, height)
		2
	);
	this.mCamera.setBackgroundColor([0.8,0.8,0.8,1]);

	this.mRenderable = new TextureRenderable(this.kTexture);

	this.mGameObj = new GameObject(this.mRenderable);
	this.mGameObj.getXform().setSize(20,20);
	this.mGameObj.getXform().setPosition(70,70);
    }
The GameObject is created just as before, but now, we have a reference to our new texture-based renderable. We also removed the behavior code for the GameObject. We do this so that the GameObject does not move independently. We will soon be adding code to move the GameObject with keyboard controls. Without changing anything else in our code, viewing this in a web browser will give you results that you can view here. The image looks darker than expected because the Scene needs lighting, which we will add shortly.

Keyboard Input
Tracking user events involves polling for the status of keys and the mouse using a number of functions provided by input module.
To find the state of a particular key, we use engine.input.isKeyPressed(). To find out if the mouse button is pressed,
we use engine.input.isButtonPressed(). In this example, we control movement of our TextureRenderable with the keyboard.
    update() {

	if(engine.input.isKeyPressed(engine.input.keys.A)){
		this.mGameObj.getXform().incXPosBy(-0.5);
	}
	if(engine.input.isKeyPressed(engine.input.keys.D)){
		this.mGameObj.getXform().incXPosBy(0.5);
	}
	if(engine.input.isKeyClicked(engine.input.keys.Q)){
		this.next();
	}
	this.mGameObj.update();
    }
Now, pressing on the 'A' key will move the GameObject to the left. Pressing the 'D' key moves the GameObject to the right.
When the 'Q' key is pressed, keyboard input is no longer processed by the game and motion is stopped. After this.next() is called,
the game loop stops and the unload() function is called, clearing all resources from memory.
Test the results here.
[Note: To start a new scene you can change the next() method so that after the call to super a new instance of a Scene subclass is started. This is how you can implement a game with multiple levels.]
Audio & Mouse Input
Audio implementation is similar to images, consisting of the following four steps:
- Create a string variable to refer to the resource and identify its file location
- Request the engine to load the resource in load()
- Use the audio
- Free the resource when it is no longer needed in unload()
    constructor() {
	super();
	this.mCamera = null;
	this.mGameObj = null;
	this.mRenderable = null;
	this.kTexture = "assets/minion_portal.png";
	this.kGameBGSong = "assets/BGClip.mp3";
	this.kGameCueSound = "assets/BlueLevel_Cue.wav";
    }

    load() {
	engine.texture.load(this.kTexture);
	engine.audio.load(this.kGameBGSong);
	engine.audio.load(this.kGameCueSound);
    }

    unload() {
	engine.texture.unload(this.kTexture);
	engine.audio.unload(this.kGameBGSong);
	engine.audio.unload(this.kGameCueSound);
    }
To play audio, we use two functions, engine.audio.playBackground() and engine.audio.playCue().
The playBackground() function allows you to play a sound clip and when the end of the clip is reached, it will loop back to the beginning.
This continuous play option works well for background music. The playCue() function plays once and stops when the end of the clip is reached.
This is used for quick sound effects like collisions or scoring achievements.
    update() {
	if(engine.input.isKeyPressed(engine.input.keys.A)){
		this.mGameObj.getXform().incXPosBy(-0.5);
	}
	if(engine.input.isKeyPressed(engine.input.keys.D)){
		this.mGameObj.getXform().incXPosBy(0.5);
	}
	if(engine.input.isKeyClicked(engine.input.keys.Q)){
		this.next();
	}
	this.mGameObj.update();

	if(engine.input.isKeyClicked(engine.input.keys.P)){
		if(engine.audio.isBackgroundPlaying()){
			engine.audio.stopBackground();
		}else{
			engine.audio.playBackground(this.kGameBGSong,0.5);
		}
	}
	if(engine.input.isButtonClicked(engine.input.eMouseButton.eLeft)){
		engine.audio.playCue(this.kGameCueSound,0.5);
	}
    }
In this example, clicking the mouse button will trigger our cue audio to play. If the 'P' key is clicked,
we use isBackgroundAudioPlaying() to determine which way to toggle the playing of the background audio. Test the results here.
[Note: The mouse input will only respond if the mouse is clicked while hovering over the WebGL canvas in the browser.]
Text
To create text, we are going to use a special kind of TextureRenderable called a FontRenderable. It uses a texture that has all the characters of a font and will copy the appropriate portions of the texture to the screen based on a string value we provide. Several font textures are automatically loaded by the engine and are available to us.
First we declare our new variable for the text we will display.
    constructor() {
	super();
	this.mCamera = null;
	this.mRenderable = null;
	this.mGameObject = null;
	this.mMessage = null;

	this.kTexture = "assets/minion_portal.png";
	this.kGameSong = "assets/BGClip.mp3";
	this.kGameCueSound = "assets/BlueLevel_cue.wav";
    }
We initialize the variable by allocating a new FontRenderable instance where we can set its initial text during creation.
The code below sets the color, size and position of the text. It uses the same functions that we have used for other renderables.
We can change the text after initialization using the setText() function.
    init() {
	this.mCamera = new engine.Camera(
		vec2.fromValues(50, 50), // position of the camera
		100,                        // width of camera
		[0, 0, 600, 600],         // viewport (orgX, orgY, width, height)
		2
	);
	this.mCamera.setBackgroundColor([0.8,0.8,0.8,1]);

	this.mRenderable = new TextureRenderable(this.kTexture);

	this.mGameObj = new GameObject(this.mRenderable);
	this.mGameObj.getXform().setSize(20,20);
	this.mGameObj.getXform().setPosition(70,70);

	this.mMessage = new FontRenderable("Sample Text");
	this.mMessage.setColor([0,1,0.2,1]);
	this.mMessage.getXform().setPosition(30,20);
	this.mMessage.setTextHeight(5);

	engine.defaultResources.setGlobalAmbientIntensity(4);
    }
Unlike the resources we request the engine to load, there are some resources that the engine provides by default. The texture that makes up the default font we use is an example of a default resource that we never need to load or unload. An ambient lighting source is another default resource. This light is always there but it is normally set very dim (we saw this in our previous examples). It is very dim so that when you do define other lighting sources, the ambient wont conflict with your design.
[Note: Changing the ambient light intensity only affects renderables drawn on the canvas. You will notice that the background color neither dims nor brightens with this setting. The background is not a renderable.]
For the first time in a while, we need to make modifications to our draw() function. We now have a second renderable.
    draw() {
	engine.clearCanvas([0.9, 0.9, 0.9, 1.0]);
	this.mCamera.setViewAndCameraMatrix();

	this.mGameObj.draw(this.mCamera)
	this.mMessage.draw(this.mCamera)
    }
Click here to see the results or our sample code. Use the 'A' and 'D' keys on the keyboard to move the sprite left and right. Press the mouse button to play a sound cue and press 'P' to activate/deactivate the background music.
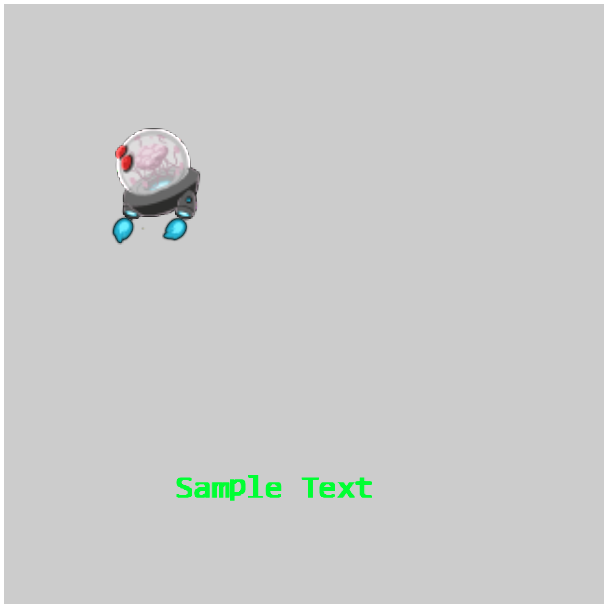
Increasing the ambient lighting intensity has brightened our sprite. We will keep that for future projects.
Conclusion
We have learned about user input and working with resources. We have moved from using solid boxes to textures as renderables. Fundamentally, our scene is quite similar to what we've done in the previous tutorial.
In Tutorial 3, we will take a look at renderables that support sprite sheets and animating textures. We will also see how to detect collisions between GameObjects.
Tutorial 1 <-- Tutorial 2 --> Tutorial 3