GTCS Game Engine:
Tutorial 4: Rigid Bodies & Particle Systems
Tutorial 3 <-- Tutorial 4 --> Tutorial 5
Tutorial Homepage
Introduction
As we have already mentioned, GameObjects allow us to control the behavior of the elements in our game as well as the interactions between them. In this tutorial, we look at using rigid bodies to apply physics to our GameObjects and creating particles.
Covered Topics: Collision Resolution • Particles
Demonstrations: Rigid Bodies • Particle System
Complete source code for all tutorials can be downloaded from here.
Collision Resolution
In Tutorial 3, we looked at detecting collisions between game elements. With per-pixel collision detection, we checked to determine if one element overlaps another. While this is very useful, for most games we need more than to just detect collisions. We need to look at collision resolution where the engine will detect a collision through overlap and "undo" the overlap before it is drawn to the screen.
To do this, we will apply an "invisible shape" over our GameObject where physics calculations will occur to simulate objects having mass and not being able to pass through each other. The game engine supports the use of rectangles and circles as rigid shapes. While these shapes are not as precise as the per-pixel collision detection we saw previously, for determining locations of objects for collision resolution, these shapes work very well. By setting a virtual mass to these shapes, the engine will calculate what happens when these objects collide.
We create a new rigid bodies object, set its size and apply it to a GameObject using the setRigidBody() function.
To simulate the physics of the game, we call the engine's physics processing functions such as physics.collideShape()for
resolving the physics interactions between two bodies.
Using Rigid Bodies
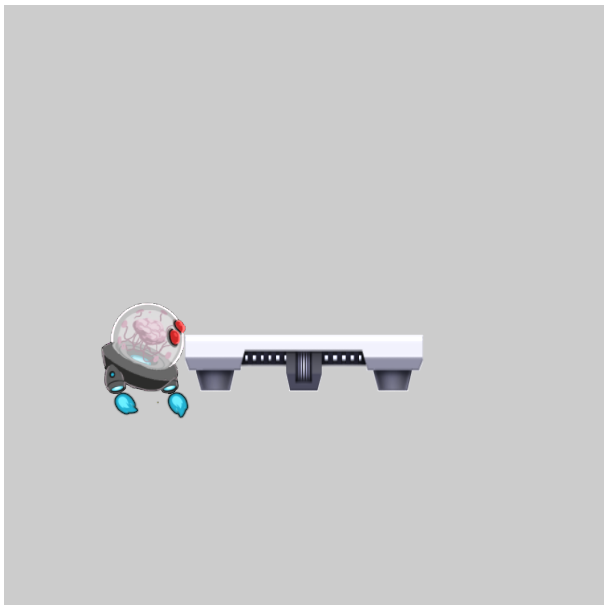
In the next example, we will create two renderables, a minion and a platform. We will place the platform in the center of our scene and allow keys to control movement of the minion. Using rigid bodies, we will make it so the minion cannot pass through the platform.
You can see the running example here. The WASD keys move the minion around the screen. The 'C' key will show/hide the rigid rectangles for the GameObjects so you can view the locations of our "rigid" boundaries.
First, we declare our instance variables and constants. Next, we load in our assets. In this example, we load in graphics for the minion (as part of our minion sprite sheet from previous examples) and the platform. We also write our parallel unload calls.
Though rigid bodies are an abstract representation for behavior, there is an area of effect
associated with them called the bounding region. For demonstration purposes, we create a variable, this.mShowBounds,
to allow us to control drawing the bounding region. Since we are only using Renderables as arguments to GameObjects we don't need a variable for them.
    constructor() {
        super();
        this.mCamera = null;
        this.mMinionObj = null;
        this.mPlatformObj = null;

        this.kTexture = "assets/minion_spritesheet.png";
        this.kPlatform = "assets/platform.png";
    }

    load() {
       engine.texture.load(this.kTexture);
       engine.texture.load(this.kPlatform);
    }

    unload() {
        engine.texture.unload(this.kTexture);
        engine.texture.unload(this.kPlatform);
    }
In the initialization function, we create our camera as we have done before. We create a minion GameObject and platform GameObject in a similar way as we have done before, this time we don't keep track of the renderables separate from the GameObjects.
    init() {
        this.mCamera = new engine.Camera(
            vec2.fromValues(50, 50), // position of the camera
            100,                        // width of camera
            [0, 0, 600, 600],         // viewport (orgX, orgY, width, height)
            2
        );
        this.mCamera.setBackgroundColor([0.8,0.8,0.8,1]);

        this.mMinionObj = new GameObject(new SpriteRenderable(this.kTexture));
        this.mMinionObj.getRenderable().setElementPixelPositions(130,310,0,180);
        this.mMinionObj.getXform().setSize(20,20);
        this.mMinionObj.getXform().setPosition(50,70);

        this.mPlatformObj = new GameObject(new TextureRenderable(this.kPlatform));
        this.mPlatformObj.getXform().setSize(40,10);
        this.mPlatformObj.getXform().setPosition(50,40);

	// ... Continued in next snippet ...
We continue our initialization by creating our rigid bodies. We create a rigid rectangle with the GameObject's transform and a size for the rigid body, by passing in the transform when the physics module acts on the RigidShape it also acts on the GameObject. We make the rigid bodies slightly smaller than their GameObject because of the empty space around the texture. Notice, for the platform, we set a mass of zero. This makes it so that collision with other bodies will not transfer motion (momentum) to this body.
        // Overide the default system acceleration so nothing moves unless we tell it to
        engine.physics.setSystemAcceleration(0,0);

        let r1 = new RigidRectangle(this.mMinionObj.getXform(),14,19);
        this.mMinionObj.setRigidBody(r1);

        let r2 = new RigidRectangle(this.mPlatformObj.getXform(),40,9);
        r2.setMass(0);
        this.mPlatformObj.setRigidBody(r2);

        engine.defaultResources.setGlobalAmbientIntensity(4);
    }
Our draw function is straightforward. We clear the canvas, setup our camera, then all of our GameObjects.
    draw() {
        engine.clearCanvas([0.9, 0.9, 0.9, 1.0]);
        this.mCamera.setViewAndCameraMatrix();

        this.mMinionObj.draw(this.mCamera);
        this.mPlatformObj.draw(this.mCamera);
    }
In the update function, we move our minion around based on the WASD keys.
We also have the ability to toggle the viewing of our rigid body bounding regions by pressing the C key.
Then we call engine.physics.collideShape() to check for and resolve collisions between the two RigidShapes within the GameObjects.
    update() {
        // Move left
        if(engine.input.isKeyPressed(engine.input.keys.A)){
            this.mMinionObj.getXform().incXPosBy(-0.5);
            this.mMinionObj.getRenderable().setElementPixelPositions(130,310,0,180)
        }
        // Move right
        if(engine.input.isKeyPressed(engine.input.keys.D)){
            this.mMinionObj.getXform().incXPosBy(0.5);
            this.mMinionObj.getRenderable().setElementPixelPositions(720,900,0,180)
        }
        // Move down
        if(engine.input.isKeyPressed(engine.input.keys.S)){
            this.mMinionObj.getXform().incYPosBy(-0.5);
        }
        // Move Up
        if(engine.input.isKeyPressed(engine.input.keys.W)){
            this.mMinionObj.getXform().incYPosBy(0.5);
        }

        // Toggle bound drawing
        if(engine.input.isKeyClicked(engine.input.keys.C)){
            this.mMinionObj.toggleDrawRigidShape();
            this.mPlatformObj.toggleDrawRigidShape();
        }
        if(engine.input.isKeyClicked(engine.input.keys.Q)){
            this.next();
        }

        engine.physics.collideShape(this.mMinionObj.getRigidBody(),this.mPlatformObj.getRigidBody());

        this.mMinionObj.update();
        this.mPlatformObj.update();
    }
A call to engine.physics.collideShape() checks if collision occurs with the two RigidShape bounds and will resolve collisions between them.
If we were dealing with more than two objects that can possible cross-collide (like balls on a billiard table) that need to be resolved
simultaneously with respect to each other, we need to have a means of handling collisions on a bigger scale. For this, we create a set or sets
of game objects and use engine.physics.processObjToSet() or engine.physics.processSetToSet() to resolve collisions with one call.
The ObjToSet call would handle a single object against a set of objects while SetToSet would check the objects in a set against the objects in another set.
Particles
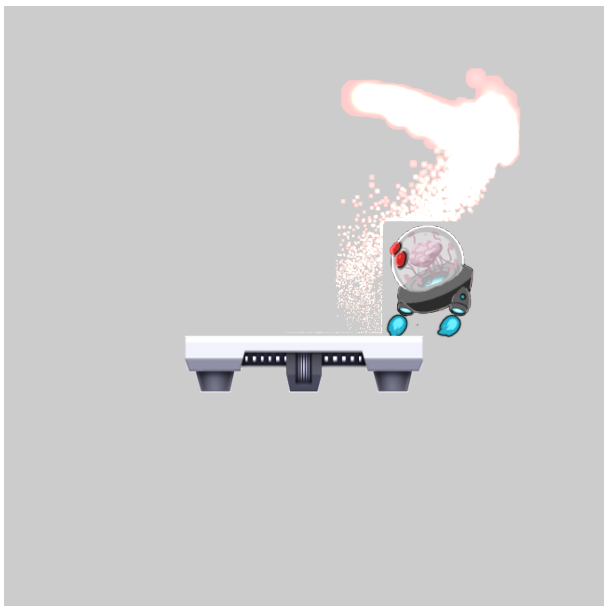
Particles are small objects that emit from a point. Over time, the particle will move further away from the emitter and change in size, color and/or opacity until it eventually dissipates. Emitters can be used to simulate smoke, explosions and rain. In the game engine, particles are implemented by a new type of object: Particle. Since we could be handling hundreds of Particle objects, we will group them in a ParticleSet to ease the task of tracking and manipulating them.
In this next example, we are going to create a ParticleEmitter object to handle the creation of the Particles. The particles will emit from our current mouse location and will fall as if under the influence of gravity. We retain all of our code from before and add particle functionality.
You can view this example here for a demonstration. The WASD keys move the minion around the screen. Clicking the 'Z' key will create a ParticleEmitter object at the current mouse location. The 'C' key will show/hide the RigidRectangle bounds for the GameObjects.
In our constructor, we identify the texture and load/unload it. We also allocate a new ParticleGameObjectSet object. We can do this here as opposed to the initialize function because it's allocation does not depend on any loaded resources. The set will store all of our particles so that we can treat them as one object rather than dozens or hundreds.
    constructor() {
        super();
        this.mCamera = null;
        this.mMinionObj = null;
        this.mPlatformObj = null;

        this.kTexture = "assets/minion_spritesheet.png";
        this.kPlatform = "assets/platform.png";
        this.kParticle = "assets/particle.png";

        this.mAllParticles = new ParticleSet();
    }

    load() {
        engine.texture.load(this.kTexture);
        engine.texture.load(this.kPlatform);
        engine.texture.load(this.kParticle);
    }

    unload() {
        engine.texture.unload(this.kTexture);
        engine.texture.unload(this.kPlatform);
        engine.texture.unload(this.kParticle);
    }
Our initialization does not need any special code for handling particles. Unlike other renderables, particle renderables will be created and destroyed on the fly during the running of the game.
We now set our ParticleSet to draw. All objects inside will draw with a single call.
    draw() {
        engine.clearCanvas([0.9, 0.9, 0.9, 1.0]);
        this.mCamera.setViewAndCameraMatrix();

        this.mMinionObj.draw(this.mCamera);
        this.mPlatformObj.draw(this.mCamera);
        this.mAllParticles.draw(this.mCamera);
    }
In our update function, we update all particles and check to see if the Z key is pressed. When pressed,
we get the mouse location and spawn a ParticleEmitter at that location using the ParticleSet.addEmitterAt() function, which will handle the creation and storage
of particles for us while updating. The fourth argument of addEmitterAt() is a function that we have to implement that actually creates a Particle instance, changes its properties
and then returns it to the ParticleEmitter inside of the ParticleSet.
    update() {
        // ... WASD movement controls as previous ...

        // Toggle bound drawing
        if(engine.input.isKeyClicked(engine.input.keys.C)){
            this.mMinionObj.toggleDrawRigidShape();
            this.mPlatformObj.toggleDrawRigidShape();
        }

        // Create a ParticleEmitter
        if(engine.input.isKeyPressed(engine.input.keys.Z)){
            let x = this.mCamera.mouseWCX();
            let y = this.mCamera.mouseWCY();
            this.mAllParticles.addEmitterAt(x,y,50,this._createParticle);
        }
        if(engine.input.isKeyClicked(engine.input.keys.Q)){
            this.next();
        }

        this.mAllParticles.update();
        engine.physics.collideShape(this.mMinionObj.getRigidBody(),this.mPlatformObj.getRigidBody());
        engine.particleSystem.resolveRigidShapeCollision(this.mMinionObj,this.mAllParticles);
        engine.particleSystem.resolveRigidShapeCollision(this.mPlatformObj,this.mAllParticles);

        this.mMinionObj.update();
        this.mPlatformObj.update();
    }
This is our _createParticle() function that takes in an X and Y location for where to spawn the new particle. We do these tasks...
- Create the Particle with the texture, screen coordinates, life value and initial color value. In this example, we set the life to a random range from 30 - 330 cycles before it expires (don't forget, the game engine runs at 60 frames per second so a particle can last from 0.5 seconds to almost 5.5 seconds). The initial color is red.
- Set up an initial size from 5.5 to 6 units in world coordinate space
- Setup the final color at red = 3.5-4.5, blue = 0.4 - 0.5 and green = 0.3 - 0.4. The red is oversaturated and will give a very bright flamelike effect. The alpha component will end at 0.6 so it will appear to become translucent.
- Setup the velocity of the particle. The X component will be -10 to +10 units. The Y component will be 0 - 10. By default, the engine implements a drag on these velocities of 5% per update. It also increases the downward Y velocity to simulate gravitational acceleration.
- Setup the size delta. In this case, the particles will reduce in size by 2% every update.
    _createParticle(X,Y){
        let life = 30 + Math.random() * 300;
	let p = new Particle("assets/particle.png", X, Y, life);

	p.setColor([1, 0, 0, 1]);

	// size of the particle
	var r = 5.5 + Math.random() * 0.5;
	p.setSize(r, r);

	// final color
	var fr = 3.5 + Math.random();
	var fg = 0.4 + 0.1 * Math.random();
	var fb = 0.3 + 0.1 * Math.random();
	p.setFinalColor([fr, fg, fb, 0.6]);

	// velocity on the particle
	var fx = 10 - 20 * Math.random();
	var fy = 10 * Math.random();
	p.setVelocity(fx, fy);

	// size delta
	p.setSizeDelta(0.98);

	return p;
    }
Note: 1) _createParticle() is a member function of our Scene subclass. 2) we can not use this.kParticle because this function will be called from a class that does not have that property, but it must have been loaded to work.
Conclusion
Rigid shapes have a many uses in games. They can be used to simulate floor and walls so that GameObjects can be constrained in their movement. They can also be used to make interactions between GameObjects more realistic. Particles give us impressive visual affects. Aside from explosions, we could simulate smoke or weather affects with particles.
In Tutorial 5, we will take a look at more visual affects by illuminating renderables with custom lighting.
Tutorial 3 <-- Tutorial 4 --> Tutorial 5
Tutorial Homepage