GTCS Game Engine:
Tutorial 6: Shadows and Parallax
Tutorial 5 <-- Tutorial 6
Tutorial Homepage
Introduction
In this tutorial, we are going to continue our understanding of lighting by working with shadow affects. To add more depth to our environment, we are going to also look at layering with parallax effects and end with parallax using camera panning.
Covered Topics: Shadows • Parallax • Panning & Parallax
Demonstrations: Casting Shadows• Parallax Effect
Complete source code for all tutorials can be downloaded from here.
Shadows
Much like lighting, in order for a shadow to be rendered, we have to register each GameObject to actively draw shadows. A GameObject can cast shadows, receive shadows, or both. We can use a LightRenderable or an IllumRenderable object as a source of shadow. To do this, we will need to use a ShadowReceiver object. The ShadowReceiver encapsulates a GameObject to provide shadow functionality, and then further encapsulates the GameObjects that will be casting the shadow on the receiver. We then use this object for drawing.
The general process is as follows...
- We create LightRenderable or IllumRenderable objects for the caster and receiver. But also define a Z position for the caster to indicate a depth offset. This value is used to calculate shadows. As usual, we encapsulate the Renderable into GameObjects.
- We create our light source making sure to activate the calculation of shadows with the source using the
setLightCastShadowTo()function. We apply the light source to the caster and receiver renderables. - We initialize a new ShadowReceiver object with the receiver's GameObject.
- For every GameObject that we wish to be able to cast shadows onto the receiver, we call the receiver's
addShadowCaster()function with a references to the caster GameObject. - During the draw phase, we draw with the ShadowReceiver object. It will calculate all shadows for its renderable during drawing. We need to make sure that we draw the ShadowReceivers before other GameObjects and to not redundantly call draw() on the shadow receiving GameObject.
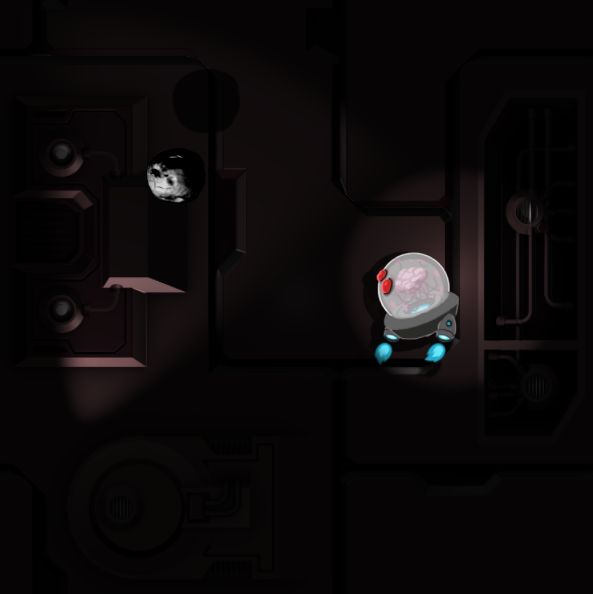
We can view our next example here. The WASD keys control the position of the minion and arrow keys control the point light. Though we do not define direction for a point light, the light is emanating from a single point five units up the Z-axis. The virtual radial "light rays" provide direction that causes the shadow to move opposing the light source.
Declare variables and load resources.
    constructor() {
	super();
	this.mCamera = null;
	this.mMinionObj = null;
	this.mBgObj = null;
	this.mPointLight = null;
	this.mRockObj = null;
	this.mSpotLight = null;
	this.mDirectionLight = null;
	this.mShadow = null;

	this.kTexture = "assets/minion_spritesheet.png";
	this.kBackground = "assets/bg.png";
	this.kBackgroundNormal = "assets/bg_normal.png";
	this.kRockTexture = "assets/asteroids.png";
	this.kRockNormal = "assets/asteroidsNormal.png";
    }

    load() {
	engine.texture.load(this.kTexture);
	engine.texture.load(this.kBackground);
	engine.texture.load(this.kBackgroundNormal);
	engine.texture.load(this.kRockTexture);
	engine.texture.load(this.kRockNormal);
    }

    unload() {
	engine.texture.unload(this.kTexture);
	engine.texture.unload(this.kBackground);
	engine.texture.unload(this.kBackgroundNormal);
	engine.texture.unload(this.kRockTexture);
	engine.texture.unload(this.kRockNormal);
    }
The changes we make from the end of Tutorial 5 for the above functions are, adding a declaration for the ShadowReceiver and changing the background's variable name to match our naming convention for GameObjects, as the background now has to be a GameObject to receive shadows.
We set the rock and minion GameObjects to be in the foreground compared to the background, using the Z-axis.
    init() {
	this.mCamera = new engine.Camera(
        	vec2.fromValues(50, 50), // position of the camera
        	100,                        // width of camera
        	[0, 0, 600, 600],         // viewport (orgX, orgY, width, height)
        	2
    	);
    	this.mBgObj = new GameObject(new IllumRenderable(this.kBackground,this.kBackgroundNormal));
    	this.mBgObj.getXform().setSize(100,100);
    	this.mBgObj.getXform().setPosition(50,50);
    	this.mBgObj.getXform().setZPos(0);

    	this.mMinionObj = new GameObject(new LightRenderable(this.kTexture));
    	this.mMinionObj.getRenderable().setElementPixelPositions(130,310,0,180);
    	this.mMinionObj.getXform().setSize(20,20);
	this.mMinionObj.getXform().setPosition(50,50);
    	this.mMinionObj.getXform().setZPos(1);

	this.mRockObj = new GameObject(new IllumRenderable(this.kRockTexture,this.kRockNormal));
    	this.mRockObj.getRenderable().setSpriteSequence(64,0,61,64,59,2);
    	this.mRockObj.getRenderable().setAnimationSpeed(2);
    	this.mRockObj.getRenderable().setAnimationType(eAnimationType.eRight);
    	this.mRockObj.getXform().setSize(10,10);
    	this.mRockObj.getXform().setPosition(30,70);
    	this.mRockObj.getXform().setZPos(1);

	// ... Continued in next snippet ...
Next, we change the light sources to be located further away on the Z-axis and set shadow casting to true, except for the directional light because it its only for making the background visible.
Then we create the ShadowReceiver object passing in the background GameObject. We call addShadowCaster() with the casters' GameObjects so both the rock and minion have shadows on the background.
	// create the light and set properties
        this.mPointLight = new Light();
        this.mPointLight.setLightType(eLightType.ePointLight);
        this.mPointLight.setColor([1,1,1,1]);
        this.mPointLight.setXPos(50);
        this.mPointLight.setYPos(50);
        this.mPointLight.setZPos(5);
        this.mPointLight.setNear(15);
        this.mPointLight.setFar(20);
        this.mPointLight.setIntensity(1);
        this.mPointLight.setLightCastShadowTo(true);

        this.mSpotLight = new Light();
        this.mSpotLight.setLightType(eLightType.eSpotLight);
        this.mSpotLight.setColor([1,1,1,1]);
        this.mSpotLight.setXPos(10);
        this.mSpotLight.setYPos(20);
        this.mSpotLight.setZPos(5);
        this.mSpotLight.setDirection([30,70,-1]);
        this.mSpotLight.setInner(0.5);
        this.mSpotLight.setOuter(1);
        this.mSpotLight.setNear(70);
        this.mSpotLight.setFar(80);
        this.mSpotLight.setDropOff(1);
        this.mSpotLight.setIntensity(2);
        this.mSpotLight.setLightCastShadowTo(true);

        this.mDirectionLight = new Light();
        this.mDirectionLight.setLightType(eLightType.eDirectionalLight);
        this.mDirectionLight.setIntensity(0.1);
        this.mDirectionLight.setZPos(4);
        this.mDirectionLight.setLightCastShadowTo(false);

        // associate the lights with the renderables
        this.mMinionObj.getRenderable().addLight(this.mPointLight);
        this.mMinionObj.getRenderable().addLight(this.mSpotLight);
        this.mBgObj.getRenderable().addLight(this.mPointLight);
        this.mBgObj.getRenderable().addLight(this.mSpotLight);
        this.mBgObj.getRenderable().addLight(this.mDirectionLight);
        this.mRockObj.getRenderable().addLight(this.mPointLight);
        this.mRockObj.getRenderable().addLight(this.mSpotLight);


        // setup the shadow relationships
        this.mShadow = new ShadowReceiver(this.mBgObj);
        this.mShadow.addShadowCaster(this.mMinionObj);
        this.mShadow.addShadowCaster(this.mRockObj);

        engine.defaultResources.setGlobalAmbientIntensity(0.5);
    }
Our draw and update functions are the same as previous examples except, for those GameObjects that must render shadows, we draw using the ShadowReceiver objects instead.
    draw() {
	engine.clearCanvas([0.9, 0.9, 0.9, 1.0]);
	this.mCamera.setViewAndCameraMatrix();

	this.mShadow.draw(this.mCamera);
	this.mMinionObj.draw(this.mCamera);
	this.mRockObj.draw(this.mCamera);
    }

    update() {
        // Move left
        if(engine.input.isKeyPressed(engine.input.keys.A)){
            this.mMinionObj.getXform().incXPosBy(-0.5);
            this.mMinionObj.getRenderable().setElementPixelPositions(130,310,0,180)
        }
        // Move right
        if(engine.input.isKeyPressed(engine.input.keys.D)){
            this.mMinionObj.getXform().incXPosBy(0.5);
            this.mMinionObj.getRenderable().setElementPixelPositions(720,900,0,180)
        }
        // Move down
        if(engine.input.isKeyPressed(engine.input.keys.S)){
            this.mMinionObj.getXform().incYPosBy(-0.5);
        }
        // Move Up
        if(engine.input.isKeyPressed(engine.input.keys.W)){
            this.mMinionObj.getXform().incYPosBy(0.5);
        }

        // Move light left
        if(engine.input.isKeyPressed(engine.input.keys.Left)){
            this.mPointLight.setXPos(this.mPointLight.getPosition()[0]-0.5);
        }
        // Move light right
        if(engine.input.isKeyPressed(engine.input.keys.Right)){
            this.mPointLight.setXPos(this.mPointLight.getPosition()[0]+0.5);
        }
        // Move light down
        if(engine.input.isKeyPressed(engine.input.keys.Down)){
            this.mPointLight.setYPos(this.mPointLight.getPosition()[1]-0.5);
        }
        // Move light Up
        if(engine.input.isKeyPressed(engine.input.keys.Up)){
            this.mPointLight.setYPos(this.mPointLight.getPosition()[1]+0.5);
        }

        // quit
        if(engine.input.isKeyClicked(engine.input.keys.Q)){
            this.next();
        }
        this.mRockObj.getRenderable().updateAnimation();
    }
Parallax
Parallax is an animation technique used to create an illusion of depth in a 2D environment. This is particularly common in side-scrolling games and is accomplished by making objects in the background scroll at a slower speed than objects in the foreground. For example, you might have cloud in the sky "in the distance" move very slowly while your characters move very quickly.
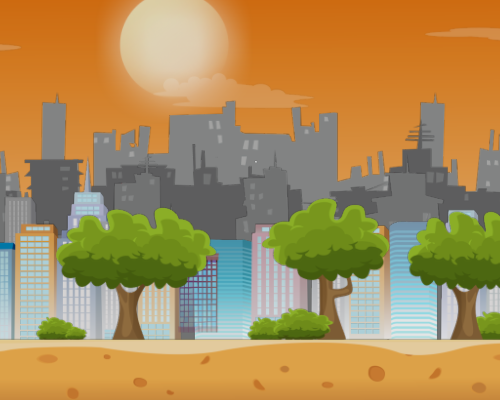
In our next example, we implement parallax as shown here. This image is created with eight layers. We will create a LightRenderable for each layer and encapsulate them in a ParallaxGameObject. These ParallaxGameObjects move can automatically with the Camera as it pans, but they each move at different speeds depending on the "scale" factor. The speed the ParallaxGameObject moves at is related to the movement of the Camera by the function, 1/scale, meaning that a scale of ten moves one tenth as fast and a scale of 0.5 moves twice as fast. We update the objects and draw in order from farthest to nearest.
The images composing the layers will be automatically tiled making it appear to be ongoing (if you watch the example long enough, the sun will disappear off the left edge of the screen and eventually reappear on the right).
First we declare all objects we need and load the resources.
    constructor() {
	super();
	this.mCamera = null;
	this.mBgL1 = null;
	this.mBgL2 = null;
	this.mBgL3 = null;
	this.mBgL4 = null;
	this.mBgL5 = null;
	this.mBgL6 = null;
	this.mBgL7 = null;
	this.mBgL8 = null;
	this.mMinionObj = null;

	this.kTexture = "assets/minion_spritesheet.png";
	this.kLayer1 = "assets/layer_01.png";
	this.kLayer2 = "assets/layer_02.png";
	this.kLayer3 = "assets/layer_03.png";
	this.kLayer4 = "assets/layer_04.png";
	this.kLayer5 = "assets/layer_05.png";
	this.kLayer6 = "assets/layer_06.png";
	this.kLayer7 = "assets/layer_07.png";
	this.kLayer8 = "assets/layer_08.png";
    }

    load() {
	engine.texture.load(this.kTexture);
	engine.texture.load(this.kLayer1);
        engine.texture.load(this.kLayer2);
        engine.texture.load(this.kLayer3);
        engine.texture.load(this.kLayer4);
        engine.texture.load(this.kLayer5);
        engine.texture.load(this.kLayer6);
        engine.texture.load(this.kLayer7);
        engine.texture.load(this.kLayer8);
    }

    unload() {
	engine.texture.unload(this.kTexture);
	engine.texture.unload(this.kLayer1);
        engine.texture.unload(this.kLayer2);
        engine.texture.unload(this.kLayer3);
        engine.texture.unload(this.kLayer4);
        engine.texture.unload(this.kLayer5);
        engine.texture.unload(this.kLayer6);
        engine.texture.unload(this.kLayer7);
        engine.texture.unload(this.kLayer8);

    }
Now we initialize each layer, we create the ParallaxGameObject, passing in the corresponding scale factor, then set their size and starting position. At the end of this function we add all of the ParallaxGameObjects to a engine-level-variable "layer" which is handy for performing routine functions on groups of objects. It is important to add the ParallaxGameObjects in descending order so that the furthest back is not overwriting the others.
    init() {
	this.mCamera = new engine.Camera(
		vec2.fromValues(50, 50), // position of the camera
		100,                        // width of camera
		[0, 0, 600, 600],         // viewport (orgX, orgY, width, height)
		2
	);
	this.mMinionObj = new GameObject(new LightRenderable(this.kTexture));
	this.mMinionObj.getRenderable().setElementPixelPositions(130,310,0,180);
	this.mMinionObj.getXform().setSize(20,20);
	this.mMinionObj.getXform().setPosition(50,50);

	this.mBgL1 = new ParallaxGameObject(new LightRenderable(this.kLayer1),1,this.mCamera);
	this.mBgL1.getXform().setSize(200,100);
	this.mBgL1.getXform().setPosition(50,50);

	this.mBgL2 = new ParallaxGameObject(new LightRenderable(this.kLayer2),2,this.mCamera);
	this.mBgL2.getXform().setSize(200,100);
	this.mBgL2.getXform().setPosition(50,50);

	this.mBgL3 = new ParallaxGameObject(new LightRenderable(this.kLayer3),3,this.mCamera);
	this.mBgL3.getXform().setSize(200,100);
	this.mBgL3.getXform().setPosition(50,50);

	this.mBgL4 = new ParallaxGameObject(new LightRenderable(this.kLayer4),4,this.mCamera);
	this.mBgL4.getXform().setSize(200,100);
	this.mBgL4.getXform().setPosition(50,50);

	this.mBgL5 = new ParallaxGameObject(new LightRenderable(this.kLayer5),5,this.mCamera);
	this.mBgL5.getXform().setSize(200,100);
	this.mBgL5.getXform().setPosition(50,50);

	this.mBgL6 = new ParallaxGameObject(new LightRenderable(this.kLayer6),6,this.mCamera);
	this.mBgL6.getXform().setSize(200,100);
	this.mBgL6.getXform().setPosition(50,50);

	this.mBgL7 = new ParallaxGameObject(new LightRenderable(this.kLayer7),7,this.mCamera);
	this.mBgL7.getXform().setSize(200,100);
	this.mBgL7.getXform().setPosition(100,50);

	this.mBgL8 = new ParallaxGameObject(new LightRenderable(this.kLayer8),8,this.mCamera);
	this.mBgL8.getXform().setSize(200,100);
	this.mBgL8.getXform().setPosition(50,50);

	// add all of the ParallaxOjbects to the background layer manager
	engine.layer.addToLayer(eBackground,this.mBgL8);
	engine.layer.addToLayer(eBackground,this.mBgL7);
	engine.layer.addToLayer(eBackground,this.mBgL6);
	engine.layer.addToLayer(eBackground,this.mBgL5);
	engine.layer.addToLayer(eBackground,this.mBgL4);
	engine.layer.addToLayer(eBackground,this.mBgL3);
	engine.layer.addToLayer(eBackground,this.mBgL2);
	engine.layer.addToLayer(eBackground,this.mBgL1);

	engine.defaultResources.setGlobalAmbientIntensity(3);
    }
Now we draw and update. Moving the minion left or right now causes the Camera to pan with it, which in turns moves the ParallaxGameObjects automatically. We draw the layers with furthest (and slowest) first. Calling engine.layer.drawLayer() and engine.layer.updateLayer() does all of the parallax draw and update calls for us.
    draw() {
	engine.clearCanvas([0.9, 0.9, 0.9, 1.0]);
	this.mCamera.setViewAndCameraMatrix();

	engine.layer.drawLayer(eBackground,this.mCamera);
	this.mMinionObj.draw(this.mCamera);
    }

    update() {
    // Move left
    if(engine.input.isKeyPressed(engine.input.keys.A)){
        this.mMinionObj.getXform().incXPosBy(-0.5);
        this.mMinionObj.getRenderable().setElementPixelPositions(130,310,0,180)
    }
    // Move right
    if(engine.input.isKeyPressed(engine.input.keys.D)){
        this.mMinionObj.getXform().incXPosBy(0.5);
    	this.mMinionObj.getRenderable().setElementPixelPositions(720,900,0,180)
    }
    this.mCamera.panWith(this.mMinionObj.getXform(),0.2);

    // quit
    if(engine.input.isKeyClicked(engine.input.keys.Q)){
    	this.next();
    }
    this.mCamera.update();
    engine.layer.updateLayer(eBackground);
    }
Conclusion
Over the course of these tutorials, we have taken a peek at many aspects of the GTCS Game Engine. For a more in-depth look at the commands, be sure to reference the API documentation.
Tutorial 5 <-- Tutorial 6
Tutorial Homepage